 Mary Harvey
1 min read
The Skills Behind Copilot Agent Studio: Why It’s Not a Technical Job
When people first hear about Copilot Agent Studio, they may assume it requires the same skills as data engineering or traditional software...

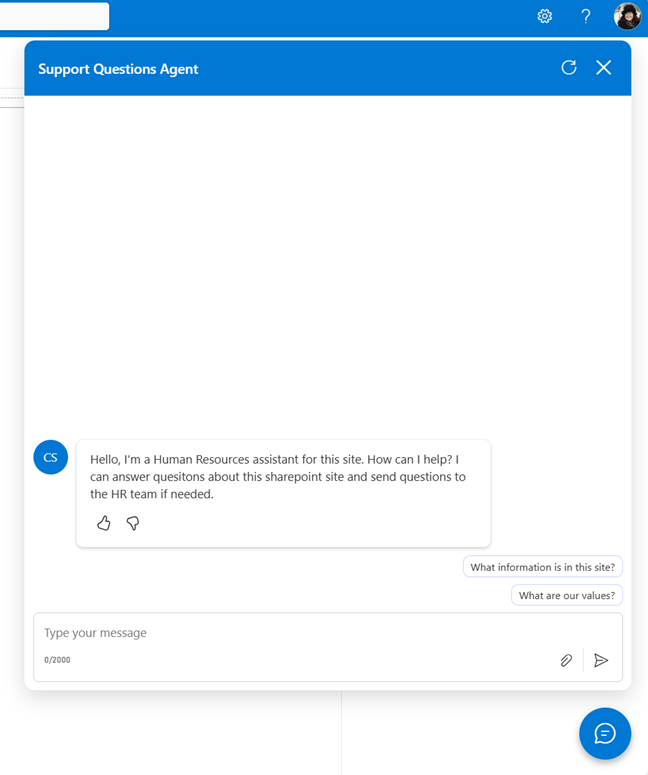
The ability to deploy Copilot Studio Agents to the SharePoint channel is the recommended approach for providing these agents in SharePoint sites. However, this capability may get lost in larger communication sites and having a chatbot button in the corner of the pages in the site (as has become expected in larger websites) that pops up a chat window may be desired.
This is doable, but it requires building a SharePoint SPFx Application Customizer component to display the button and popup window that contains the Copilot Studio agent. It also requires setting app registrations in Entra ID and then implementing the process of retrieving a silent token for the logged in user from SharePoint that is then passed to the agent for SSO authentication.
For assistance in implementing this kind of authentication in the chat component, there is an example in Microsoft’s Copilot Studio Samples GitHub repository, Copilot Studio Agent Side Panel for SharePoint: https://github.com/microsoft/CopilotStudioSamples/blob/main/ui/embed/sharepoint-customizer. This example has a button in the header that opens a side panel in the browser as opposed to having a floating button that pops up the chat window, but the exact configuration of App registrations and input properties may not be clear. This blog helps to clarify the configuration that is necessary and then suggests how you can use GitHub Copilot to construct your SPFx component.
The example provided in GitHub is quite helpful, but it leverages several property values based on the authentication configuration for your agent in Copilot Studio and in Entra ID. In Entra ID, an App Registration for the agent will be created automatically. However, to embed the agent in a SPFx extension in SharePoint, a second app registration for this client web application is also needed. The Agent App Registration is then configured with an exposed API that grants permissions to the client web application to access/invoke the agent.
After configuring the App Registrations, these property values are set in the SPFx component.
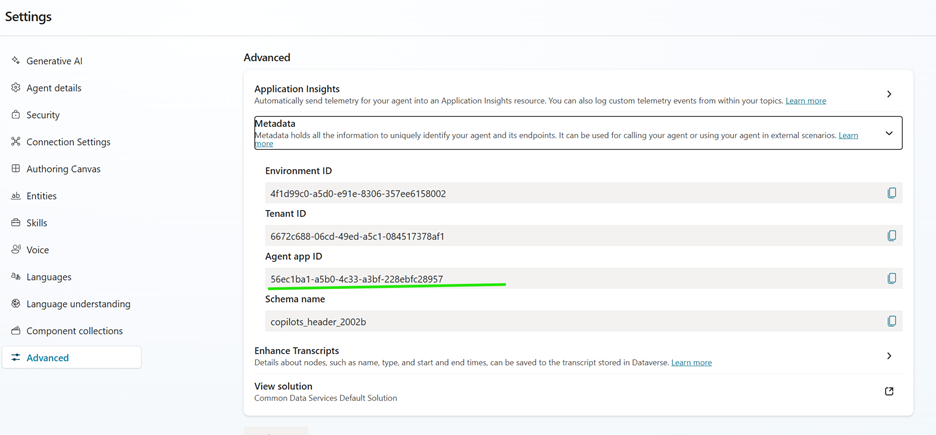
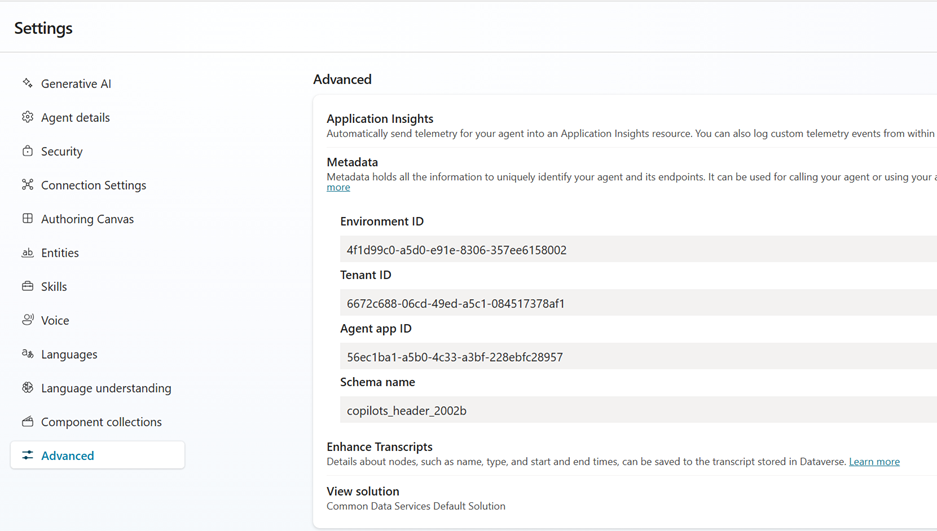
Starting with the agent app registration, this should be automatically created in Entra ID by Copilot Studio. If you go into Settings->Advanced->Metadata, you can find the Application ID for the agent:
The next step is to search for the App Registration in Entra ID App Registrations using that ID:
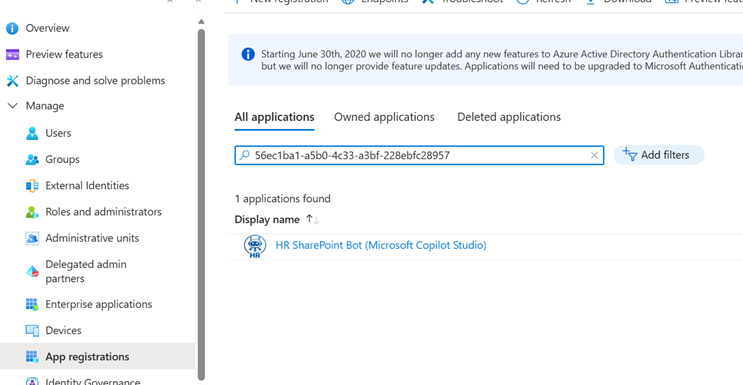
Note that the name of the agent will be the initial name of the agent when it was created in Copilot Studio (e.g. Agent 2). The name of the App Registration can be updated in Entra ID if needed.
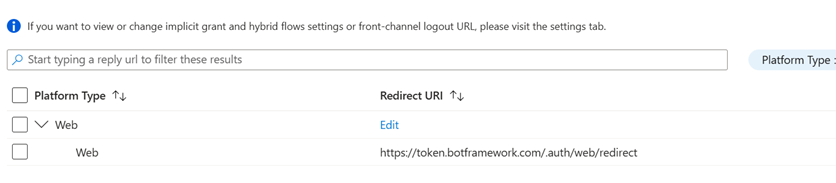
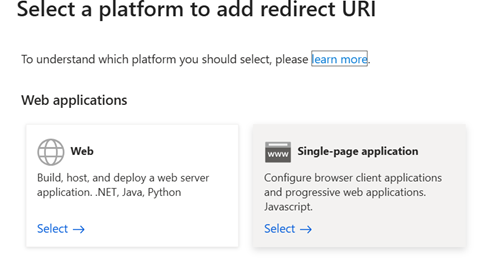
In the App Registration for the Agent, support for OAuth authentication and integration with for the client application needs to be added. In the App registration, click the Authentication area and add a Web redirect URI for
https://token.botframework.com/.auth/web/redirect
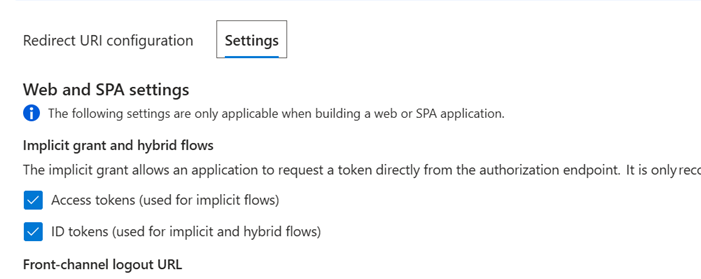
Under Settings for authentication, be sure to check off support for tokens:
Add and copy a Client Secret under Certificates and secrets being sure to copy the secret value just after it is created:

Under API Permissions, add Microsoft Graph Delegated permissions for:
If SharePoint is a knowledge source for the agent, add delegated permissions for Sites.Read as well.
Granting Admin Consent is not necessary for Delegated permissions, but it avoids the extra prompts to the user to consent to these permissions.
The final configuration will look similar to this:

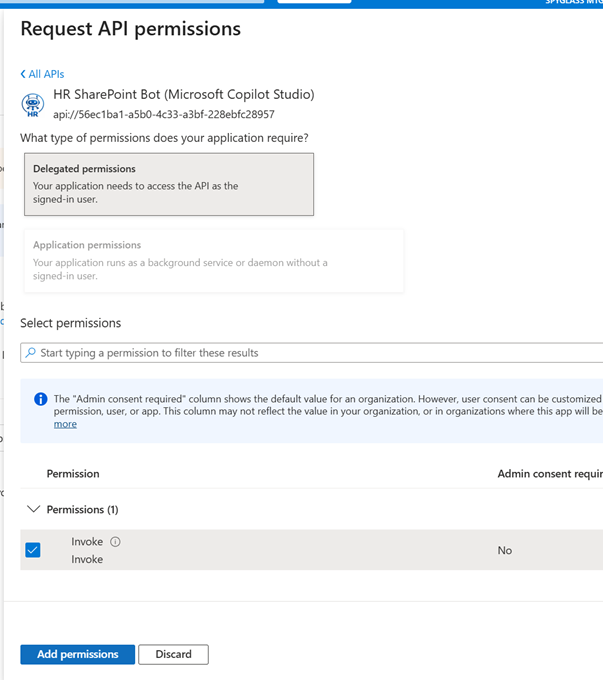
Lastly, the agent application needs to expose an API that the client application can use to request permission to invoke it. Navigate to the Expose an API section of the registration.
Add an overall URI by clicking the “Add” link next to Application ID URI:
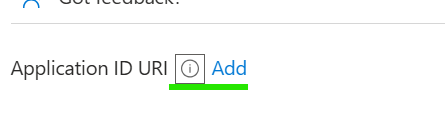
The URI that is generated will be needed for configuration of the agent authentication in Copilot Studio.

Next, add a scope for Admins and Users to consent. You can give any name to the scope but it means that the client application is able to invoke or access the agent.

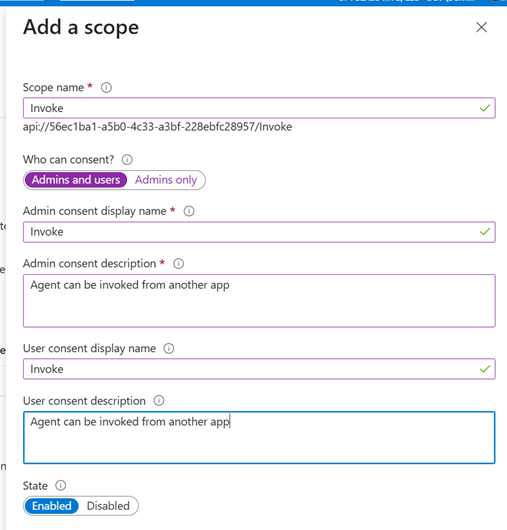
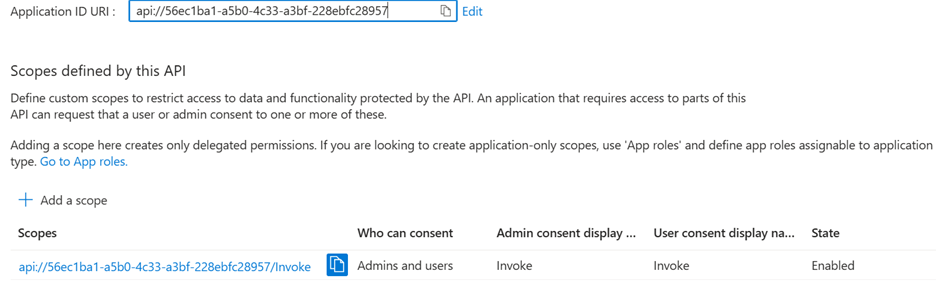
The final configuration should look like this:
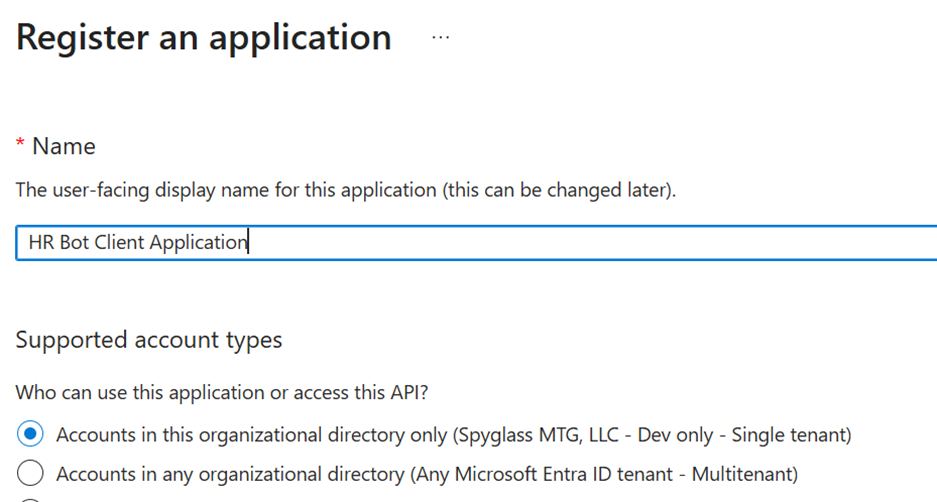
Next, a new app registration will need to be created that can be used by the SPFx component to integrate with the agent.
Back in the main App registrations area of Entra ID, click to add a new registration:

In the Registration form, provide a name for the SPFx container application and click Register.
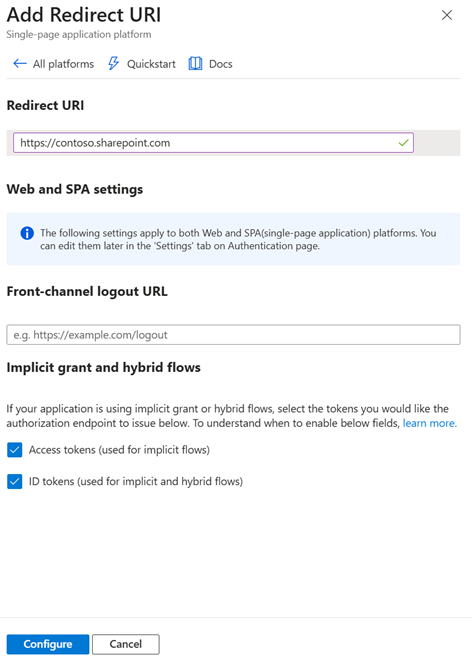
Next, under Authentication, add a Sing-page application redirect:
For the Redirect URI, put in the URL for your tenant’s SharePoint. Also, check off the ability to handle tokens and click Configure.
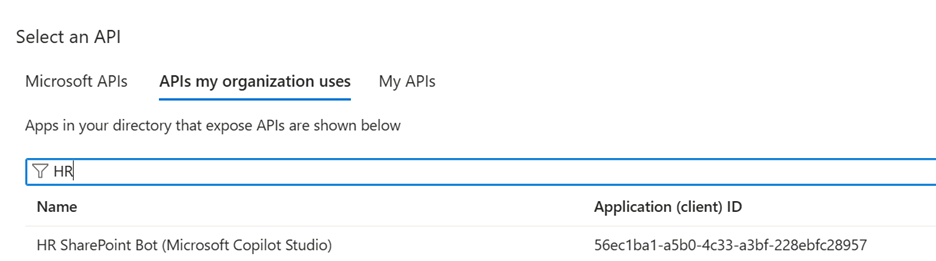
For the API permissions for this app registration, it should already have User.Read as a delegated permission, but it will also need the custom API created above as well as permission to use the Power Platform API.
To add these permissions, click +Add a permission, but this time, click the API’s my organization uses tab at the top of the pane.
Search for your agent app registration and add the custom API it exposed:
Next, you need to do the same thing to add the Power Platform API
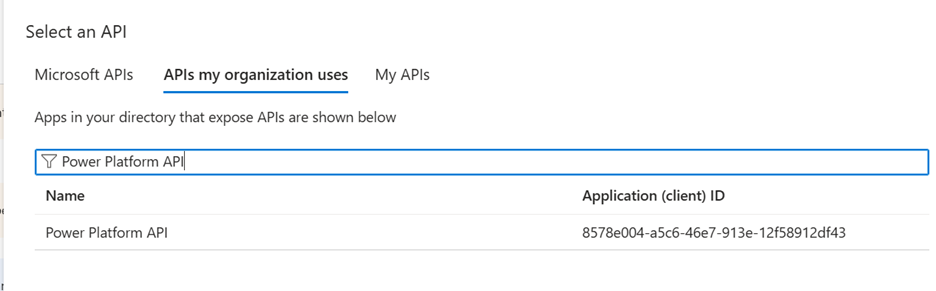
If that API is not shown when searching, follow the instructions in this Learn article: https://learn.microsoft.com/en-us/power-platform/admin/programmability-authentication-v2?tabs=powershell#step-2-configure-api-permissions for the PowerShell command to run to make it visible in your tenant.
Once it is shown, search for the CopilotStudio.Copilots.Invoke permission to add it to your app registration:
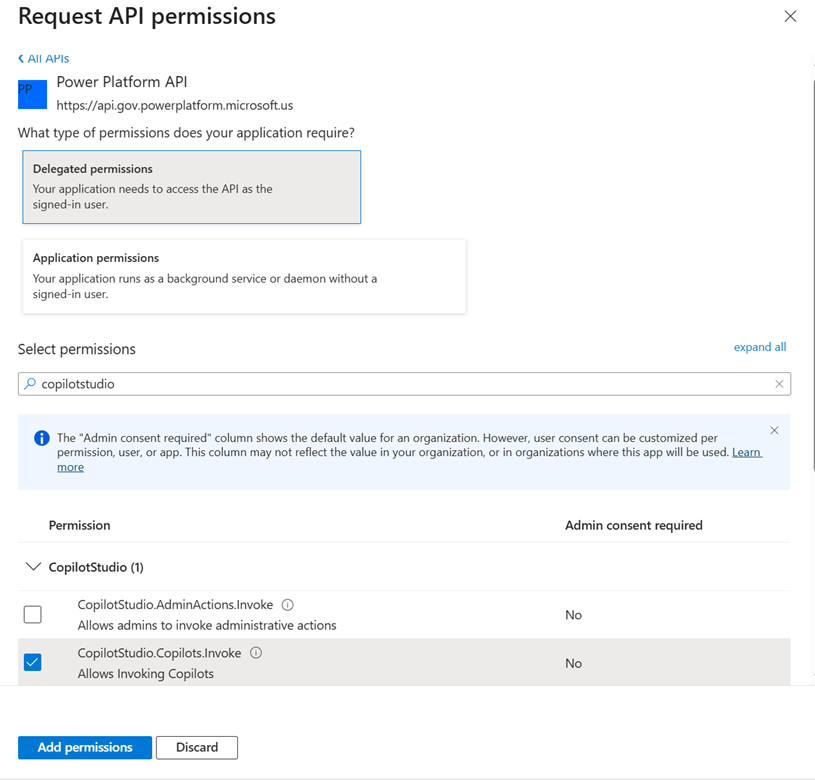
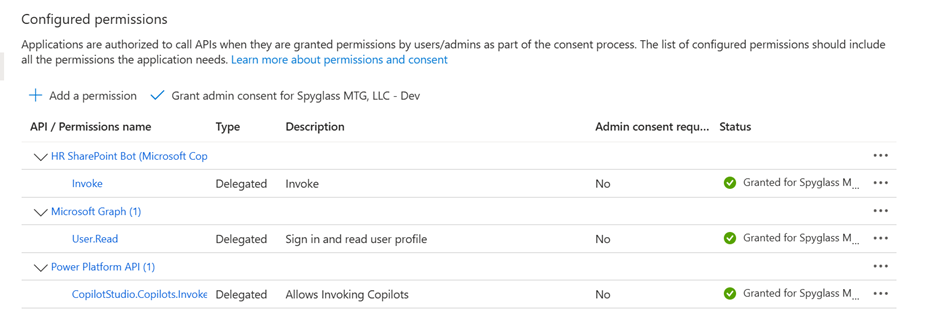
The final API Permissions should be as follows. Again, it is recommended that Admin Consent be granted to avoid additional user prompts.
And that’s it for Entra ID!
Per the instructions for the SharePoint Customizer sample above, your Copilot Studio agent should be configured to use Microsoft Authentication as it would for Teams, Microsoft 365 Copilot, and SharePoint.
Finally, we get to the SPFx component. I recommend using the “Plan” mode for your GitHub Copilot agent to help develop the full prompt to generate the SPFx component. This will help to correct incorrect assumptions the agent may make before it actually generates any code such as using the more generic iFrame approach for a chat bot vs. leveraging the Microsoft Copilot SDK. You can also provide the plan with the URL to the sample from GitHub to help it understand the authentication model and proper properties for the component.
Using Claude Opus 4.6, my “Plan” conversation went like this:
“In the current project folder, I want to create a new SharePoint SPFX extension called Copilot Studio Agent Launcher. Do not provision any web parts.”
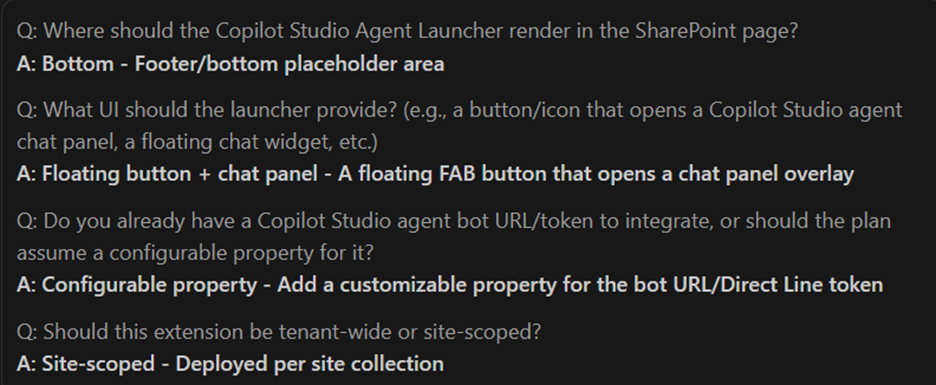
This prompted me to answer 4 questions about the component which I answered as shown:
It then created a decent starting prompt which I reviewed. I found it wanted to use the iFrame approach for the chat bot, and I want to use the approach from the sample. So, my next prompt was:
“Update the plan to use the Microsoft Copilot SDK to integrate with the Copilot Studio Agent. Follow the example in https://github.com/microsoft/CopilotStudioSamples/tree/main/SSOSamples/SharePointSSOAppCustomizer but put the chat bot in the overlay popup and not in a side panel. Also use the latest ShsarePoint Framework 1.22”
This worked beautifully. The agent picked up the authentication and chat integration using the Microsoft Copilot SDK from the sample and applied it to the plan.
I then noticed that it would center the popup window and I wanted it at the bottom right of the screen, so I made that correction:
“Have the chat button and overlay popup be at the bottom right of the screen, not centered”
Now that I had the prompt that I wanted, I told the agent to build the component with that prompt.
After building, all looked great except that there were two connection properties from the GitHub sample, agentIdentifier and environmentId, that were missing from the serve.json file. I asked the Copilot Agent to add those for me:
“Please add a component property for agentIdentifier and environmentId that can be configured in serve.json and passed thru to the ConnectionSettings for the chat client”
This was not strictly necessary. In the connection to the Copilot Studio Agent, you can provide either the environment Id and agent Identifier or a directConnectUrl, but this provides flexibility to have both configuration properties.
So, now all that is left is to fill in the properties of the serve.json file and test! The properties that you will need to fill in you need to take from the Entra ID App registrations created at the top of this article.
Note that for the environment Id, tenant Id, and agent identifier, you can locate this information in the Settings area of the agent under Advanced->Metadata:
At this point, you should be ready to test! Add your SharePoint site with a reference to the workbench page (e.g. https://sgmtgdev.sharepoint.com/sites/humanresources/_layouts/15/workbench.aspx) to view your agent in the context of SharePoint before you package and deploy. Then enter npm run start to launch the local server and the workbench page to see the result:

1 min read
When people first hear about Copilot Agent Studio, they may assume it requires the same skills as data engineering or traditional software...

1 min read
With the rise of being able to create high-value AI-powered agents using Microsoft Copilot and Copilot Studio, there is a corresponding rise in the...

1 min read
AI coding assistants like Claude Code and GitHub Copilot are remarkably capable — they can refactor entire modules, debug complex issues, and...