1 min read
Unifying Enterprise Data with Databricks Unity Catalog: A Real-World Success Story
In today’s enterprise landscape, data often lives in silos — across on-premises systems, cloud databases, and analytics platforms. When we started...
6 min read

A pragmatic architecture pattern for modern enterprise data platforms
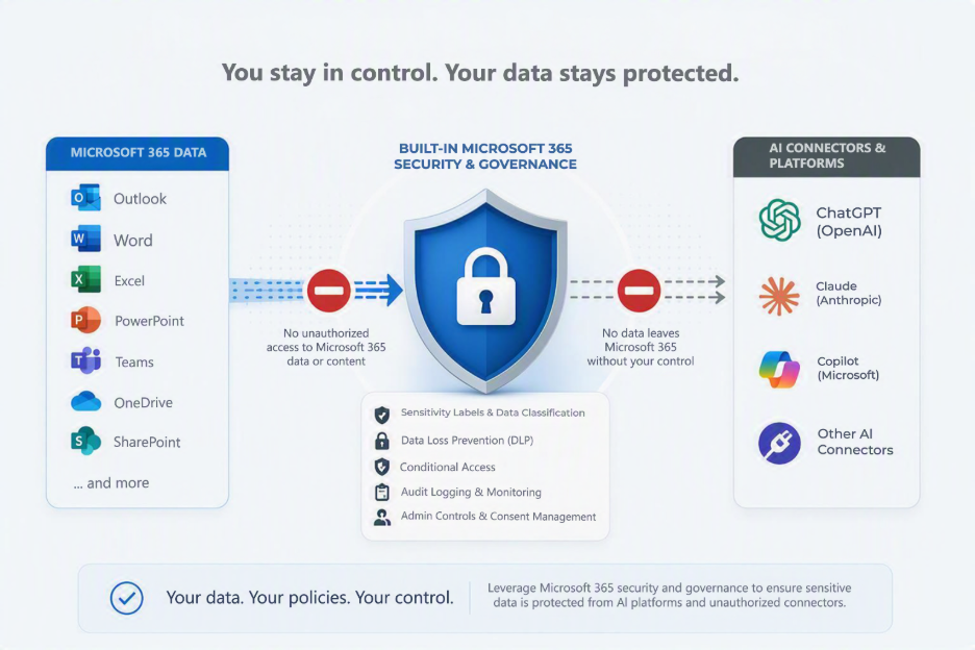
Generative AI has rapidly become part of the enterprise workplace. Users increasingly want to connect Microsoft 365 content including SharePoint Online, OneDrive, Teams, Exchange Online, and other business applications to AI assistants such as Copilot, ChatGPT, and Claude. While these tools can significantly improve productivity, they also introduce one of the biggest challenges for Microsoft 365 administrators:
How do you allow AI innovation while preventing sensitive corporate data from being exposed?
The answer is not simply blocking AI assistants; organizations need a layered security model that protects data regardless of which AI application or agent users choose.
A practical Microsoft 365 implementation guide for administrators
This blog addresses one specific use case: protect a defined list of SharePoint Online sites that contain sensitive information, while leaving the rest of the tenant available for normal collaboration and AI use. [VA1] [KD2] The approach combines Microsoft Purview sensitivity labels, SharePoint site sharing controls, Restricted Content Discovery for temporary reduction of discoverability, and scoped DLP policies. Microsoft’s current guidance is that sensitivity labels can protect SharePoint sites and documents, that SharePoint file labeling needs tenant-level enablement, and that Restricted Content Discovery is a short-term control for reducing discovery in Microsoft 365 Copilot and tenant search while permissions are reviewed. Use this pattern for sites such as Finance, HR, Payroll, Legal, M&A, Security, or any project site that contains content you do not want broadly discovered or easily shared.
1. Build your site inventory first
Start with a short list of the sites you want to protect. For each site, record the URL, business owner, data type, whether external sharing is required, and whether you want the site temporarily removed from broad discovery while permissions are being reviewed. Microsoft’s SharePoint Advanced Management guidance calls out data access governance reports for identifying overshared or sensitive sites, and the sensitivity label snapshot report is meant to give you that baseline across SharePoint and OneDrive.
A simple inventory can look like this:
|
Site URL |
Data type |
Label |
External sharing |
|
/sites/finance |
Financial |
Highly Confidential |
Blocked |
|
/sites/hr |
Employee |
Highly Confidential |
Blocked |
|
/sites/legal |
Legal |
Confidential |
Restricted |
2. Enable SharePoint for sensitivity labels on files
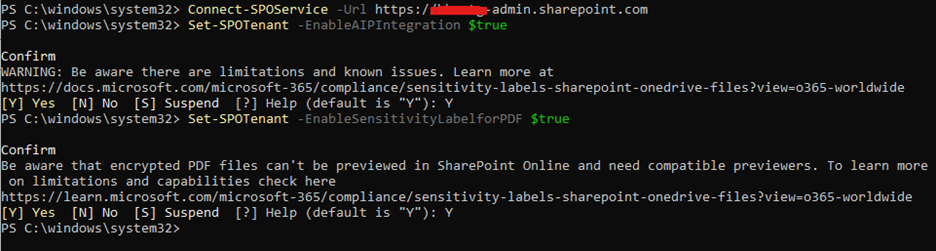
If you want labeled Office files and PDF files in SharePoint and OneDrive to be recognized and processed correctly, you must enable sensitivity label support in SharePoint Online with PowerShell. The documented path is Set-SPOTenant -EnableAIPIntegration $true, and -EnableSensitivityLabelforPDF $true for PDF support. Once enabled, SharePoint and OneDrive recognize supported labeled encrypted files and that new audit events become available for labeled files.
Use the SharePoint Online Management Shell:
Install-Module Microsoft.Online.SharePoint.PowerShell -Scope CurrentUser
Connect-SPOService -Url https://<tenant>-admin.sharepoint.com
Set-SPOTenant -EnableAIPIntegration $true
Set-SPOTenant -EnableSensitivityLabelforPDF $true[KD1] [KD2]
To enable the settings for M365 groups in Entra, run the following Microsoft Graph commands -
Install-Module Microsoft.Graph.Authentication -Scope CurrentUser Install-Module Microsoft.Graph.Beta.Identity.DirectoryManagement -Scope CurrentUser[KD3]
Connect-MgGraph -Scopes "Directory.ReadWrite.All"
Fetch the current group settings for the Microsoft Entra organization and display the current group settings.
$grpUnifiedSetting = Get-MgBetaDirectorySetting | Where-Object { $_.Values.Name -eq "EnableMIPLabels" }
$grpUnifiedSetting.Values
You will notice that EnableMIPLabels is set to False.
Apply the new settings.
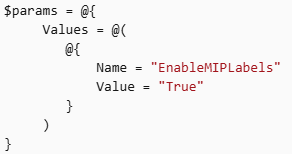
Update-MgBetaDirectorySetting -DirectorySettingId $grpUnifiedSetting.Id -BodyParameter $params
3. Create the sensitivity labels in Microsoft Purview
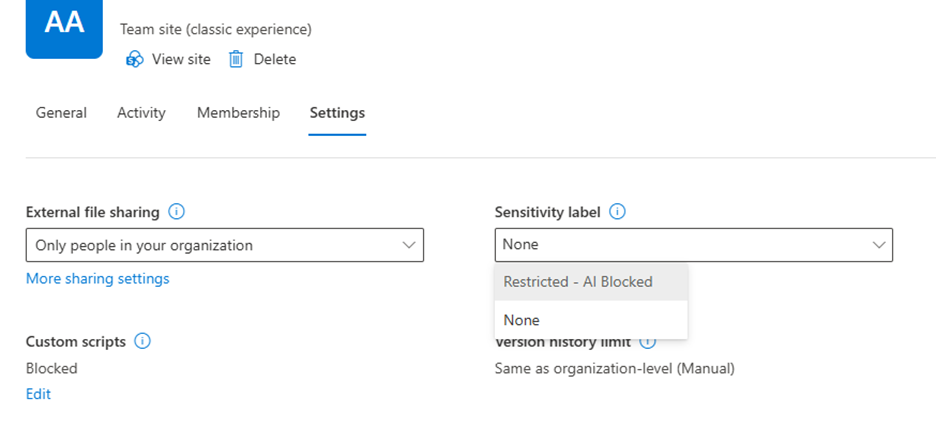
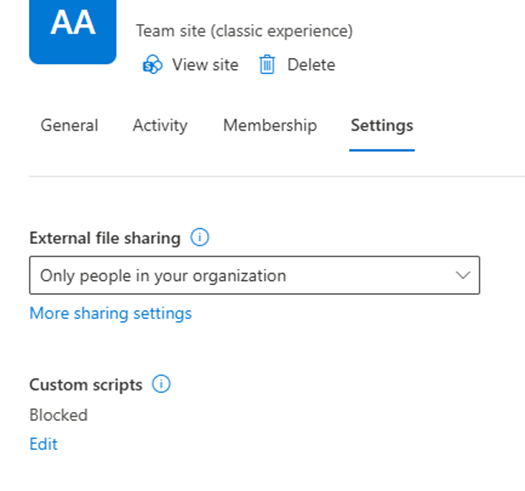
When the sensitivity labels are not configured in the tenant, you will notice that the "Sensitivity label" field is read only.
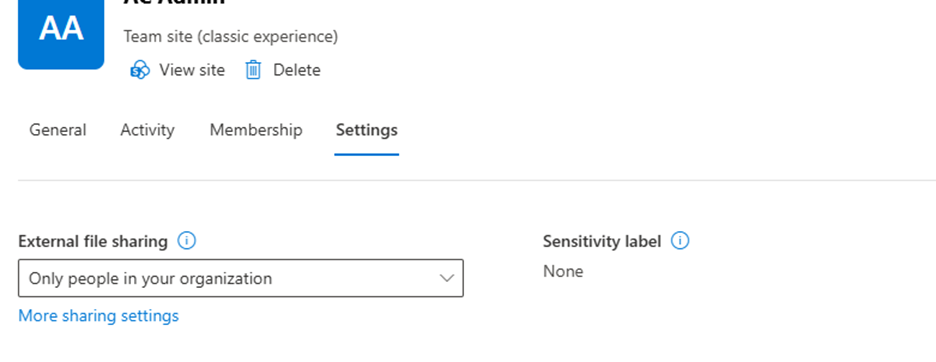
Create the labels in the Microsoft Purview portal under Solutions -> Information Protection -> Sensitivity labels.
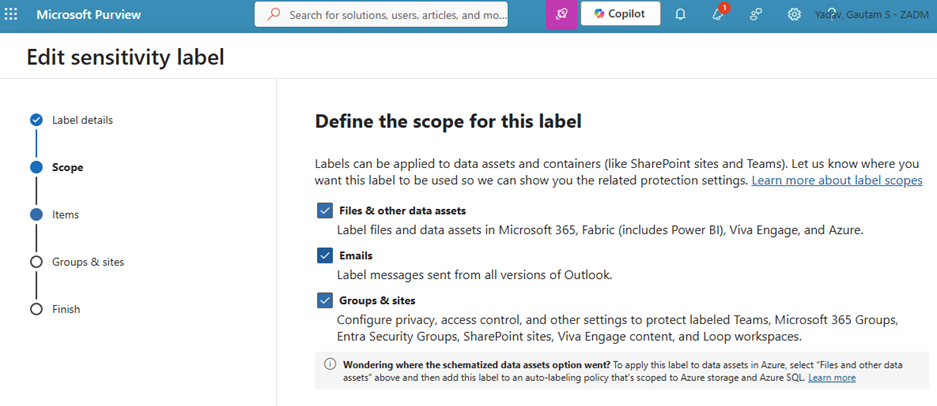
All Microsoft Purview Information Protection solutions are implemented through sensitivity labels, and for collaborative workspaces the label scope must include Groups & sites.
Recommended labels for this scenario
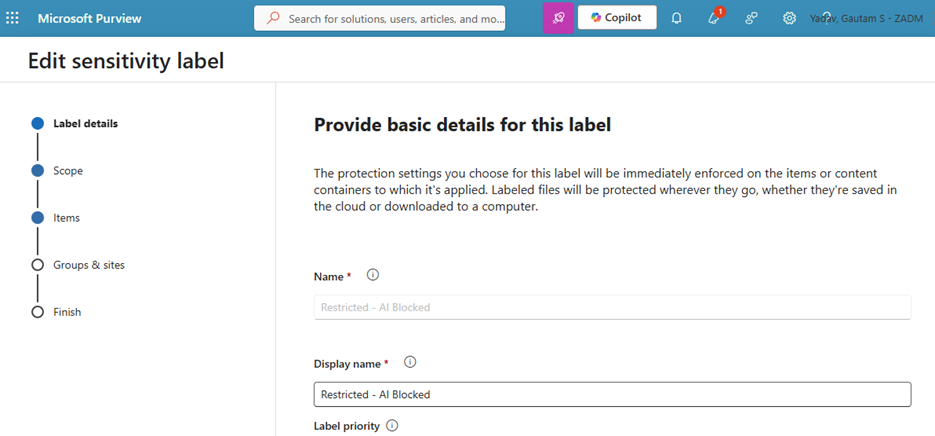
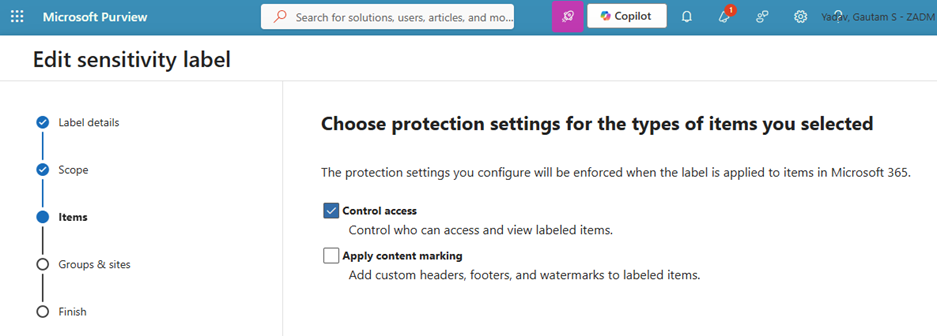
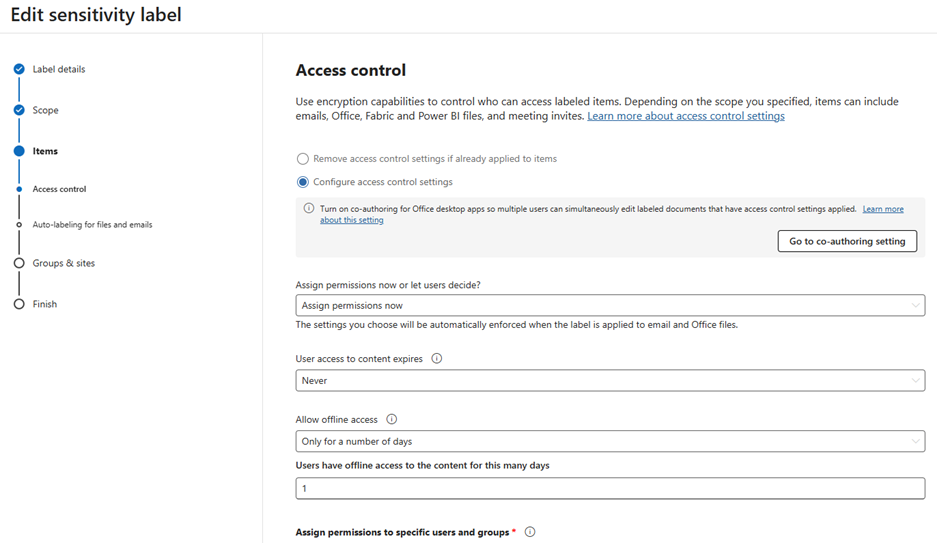
Recommended settings for a protected SharePoint site label
Use a label such as Restriced with these settings:
The privacy and site-setting behavior for container labels, including the fact that public/private settings are locked when the label is applied.
PowerShell to see labels and pick the GUID
To apply a site label through PowerShell, you need the label identifier. Use the Get-Label in Security & Compliance PowerShell for viewing the sensitivity labels.
Connect-IPPSSession
Get-Label | Select DisplayName, Guid
4. Sync the label so it can be applied to SharePoint sites
The sensitivity labels for groups and sites must be synchronized into Microsoft Entra ID with Execute-AzureAdLabelSync. If you were using sensitivity labels before September 2019, this sync step is required. Also, the labels must be published in Purview before syncing.
Connect-IPPSSession
Execute-AzureAdLabelSync
Allow time for replication before you move on to site application.
5. Apply the label to each protected SharePoint site
You can apply the label to the SharePoint sites with the following commands
Connect-SPOService -Url https://<tenant>-admin.sharepoint.com
Set-SPOSite -Identity https://<tenant>.sharepoint.com/sites/finance `
-SensitivityLabel "<label-guid>"
Bulk Apply from CSV
This is the pattern I recommend when you have several sites to protect.
Connect-SPOService -Url https://<tenant>-admin.sharepoint.com
$rows = Import-Csv ".\protected-sites.csv"
foreach ($row in $rows) {
Set-SPOSite -Identity $row.SiteUrl -SensitivityLabel $row.LabelGuid
}
Example protected-sites.csv:
SiteUrl,LabelGuid
https://<tenant>.sharepoint.com/sites/finance,<guid-here>
https://<tenant>.sharepoint.com/sites/hr,<guid-here>
https://<tenant>.sharepoint.com/sites/legal,<guid-here>
6. Tighten sharing for the protected sites
SharePoint external sharing should be set in two layers: organization level and site level. Microsoft says the organization setting establishes the ceiling, and the site setting cannot be more permissive than the organization setting. It also documents that if you change org-level sharing later, site behavior can follow that ceiling.
Recommended site-level settings for sensitive sites
For protected sites, use the most restrictive setting that still supports the business process:
Microsoft documents that these settings can be changed in SharePoint admin center -> Active sites ->site -> Sharing and also through Set-SPOSite sharing parameters.
PowerShell example
Set-SPOSite -Identity https://<tenant>.sharepoint.com/sites/finance -SharingCapability Disabled
If you need a more nuanced setting, use the site sharing parameters exposed by Set-SPOSite to align the site with your tenant policy. Microsoft’s cmdlet documentation lists sharing-related parameters such as SharingCapability, DefaultSharingLinkType, and DefaultLinkPermission.
7. Use Restricted Content Discovery while permissions are being cleaned up
Restricted Content Discovery is useful when the site is sensitive and still under review. Microsoft says it is a short-term control that keeps content from a SharePoint site out of organization-wide search and Microsoft 365 Copilot experiences unless a user recently interacted with the content. It applies only to SharePoint sites, not OneDrive, and should be used selectively because overuse can reduce search and Copilot completeness.
Portal method
Go to SharePoint admin center -> Active sites -> select site -> Settings -> Restrict content from Microsoft 365 Copilot and turn it on.
PowerShell method
Set-SPOSite -Identity https://<tenant>.sharepoint.com/sites/finance -RestrictContentOrgWideSearch $true
To remove it later:
Set-SPOSite -Identity https://<tenant>.sharepoint.com/sites/finance -RestrictContentOrgWideSearch $false
Microsoft also documents a tenant-wide status view and delegation options for this feature.
8. Create a DLP policy scoped only to the protected sites
Microsoft Purview DLP is the control that stops sensitive information from being shared or moved in ways you do not want. Microsoft’s DLP guidance recommends planning the policy, mapping it to a specific intent, and deploying it in simulation first so you can validate impact before enforcement. Microsoft also documents that policy tips can be used to guide users without immediately blocking them.
Recommended DLP rollout pattern
Portal method
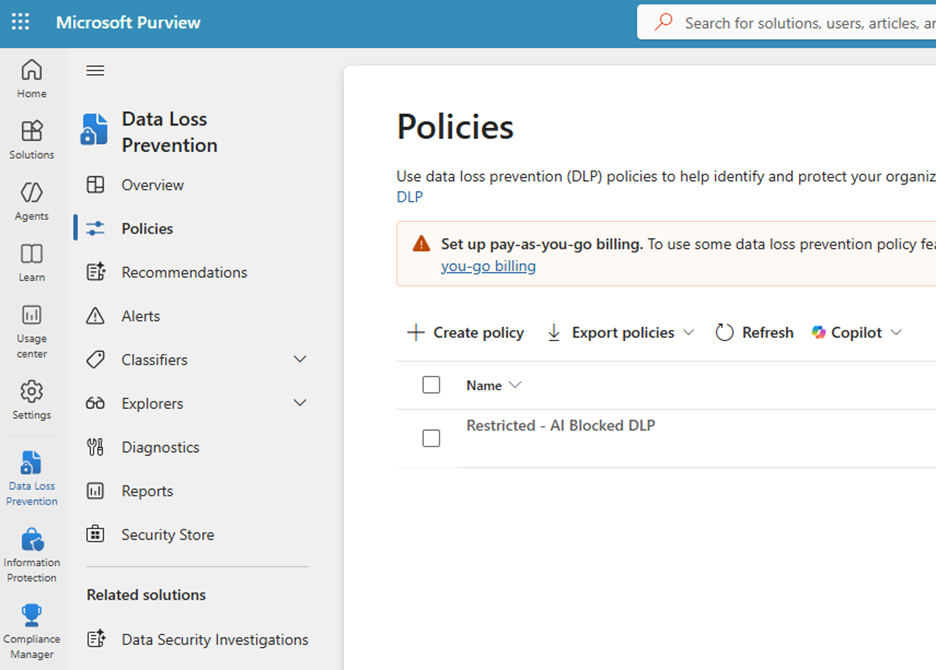
Go to Microsoft Purview -> Data loss prevention -> Policies -> Create policy. Scope it only to the protected SharePoint sites.
PowerShell example
Microsoft documents that the SharePointLocation parameter on New-DlpCompliancePolicy accepts specific SharePoint site URLs.
Connect-IPPSSession
New-DlpCompliancePolicy `
-Name "SPO-High-Risk-Sites" `
-Comment "Protect Finance and HR SharePoint sites" `
-SharePointLocation "https://<tenant>.sharepoint.com/sites/finance","https://<tenant>.sharepoint.com/sites/hr"
You can then add a rule that reacts to your chosen condition. Microsoft documents New-DlpComplianceRule for DLP rule creation in Security & Compliance PowerShell.
New-DlpComplianceRule `
-Name "Block-SSN-From-HighRisk-Sites" `
-Policy "SPO-High-Risk-Sites" `
-ContentContainsSensitiveInformation @{Name="U.S. Social Security Number (SSN)"} `
-BlockAccess $true
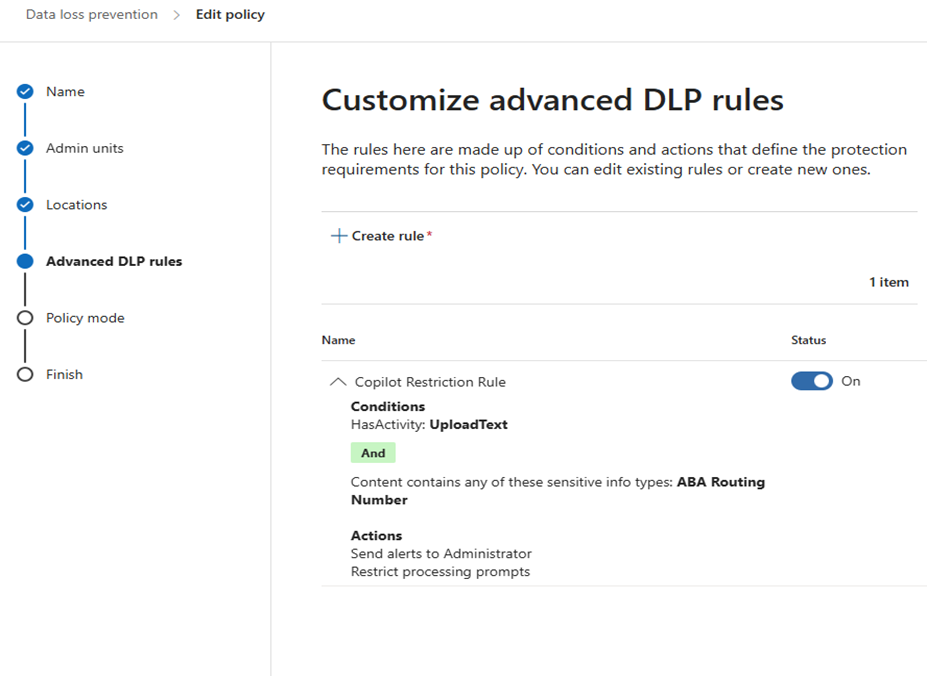
If you prefer to use sensitivity labels as the condition, Microsoft’s guidance for SharePoint and Copilot-related protection says you can combine sensitivity labels with DLP to protect sensitive content.
 .
.
9. Validate the protection end to end
After you configure one site, test the following:
Suggested test cases
Operational checklist
Conclusion
Blocking AI connectors in the environment alone is not an effective long-term security strategy. Employees can use many AI services including Claude, Gemini, Perplexity, browser extensions, and future tools that connect to Microsoft 365 or accept copied content.
The most effective approach is to build a defense-in-depth strategy using Microsoft Purview, Microsoft Entra ID, Defender for Cloud Apps, Conditional Access, Data Loss Prevention, Sensitivity Labels, Endpoint DLP, and sound SharePoint governance. When these controls are implemented together, organizations can embrace AI innovation while ensuring that sensitive information remains protected and accessible only to authorized users.
Organizations that invest in strong data governance today will be far better positioned to adopt Microsoft 365 Copilot and other enterprise AI solutions securely and confidently in the future.
For more information about how Spyglass MTG can help secure your SharePoint Online and M365 environment from AI connectors, contact us today.

1 min read
In today’s enterprise landscape, data often lives in silos — across on-premises systems, cloud databases, and analytics platforms. When we started...

1 min read
For decades, the Data Warehouse Subject Area pattern has served as the backbone of enterprise data architecture. These subject areas, such as Sales,...

1 min read
Microsoft Fabric has traditionally concentrated on analytical databases, data transformation, and data visualization. Recently, Microsoft has...