 Ian Dicker
1 min read
Let The PromptFlow
In the rapidly evolving landscape of artificial intelligence, generative AI solutions are becoming increasingly central to a myriad of applications,...

If you use Cloud technologies, then chances are you have guest users in your Office 365, Azure, or Dynamics 365 deployments, or perhaps even all three. These guests could be external parties you are collaborating with, or it could be that you gave a vendor temporary access to complete some design or implementation work. How you manage the creation of these accounts, reviewing their access and ultimately removing their access is part of the process of Identity Governance. Identity Governance is essential to maintaining a good security perimeter, as identity is the new primary security perimeter.
The processes for identity governance in most organizations are typically very manual processes involving forms and email communication; often accounts are left with access for long periods after they are no longer needed. Sometimes, the person assigned to supervise a guest account is no longer in the role, or perhaps has moved on from the organization. This leaves IT with an administrative nightmare; afraid to remove access, unsure of where the access was granted and at what level, and unsure of who to contact to make the decision.
Azure Active Directory provides a series of features for Identity Governance. These include Privilege Identity Management, Access Reviews, and Entitlement Management. These features are available in the Azure AD Premium P2 License. Azure AD Identity Governance allows an organization to balance the needs of security and employee / vendor productivity. Identity Governance provides the organization methods by which they can:
Identity governance is a large topic and the 3 components of the Azure Identity Governance offering are all feature rich and powerful in their own right. This blog will skim one of the topics, Access Life Cycle Management using Entitlement Management.
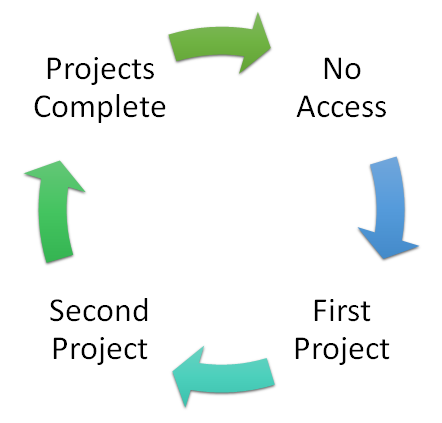
Let’s look at a typical scenario. A guest or vendor goes through a life cycle of no access, first role or contract, maybe a second or an extension to the first, and finally the contracts expire and the user's access will be retired. Ultimately, the account should be removed from the directory.
The feature in Azure AD used to control the Access Life Cycle is Entitlement Management, and by using this feature it is possible to grant a user access to an Office 365 Group (and hence Teams), SharePoint Sites, and applications and wrap it all with governance and expiration. Typically, we use this feature with our clients for controlling guest or vendor access. However, it can be used to provide access to employees in the same way.
To use Identity Governance Entitlement Management lets first break down the structures used.
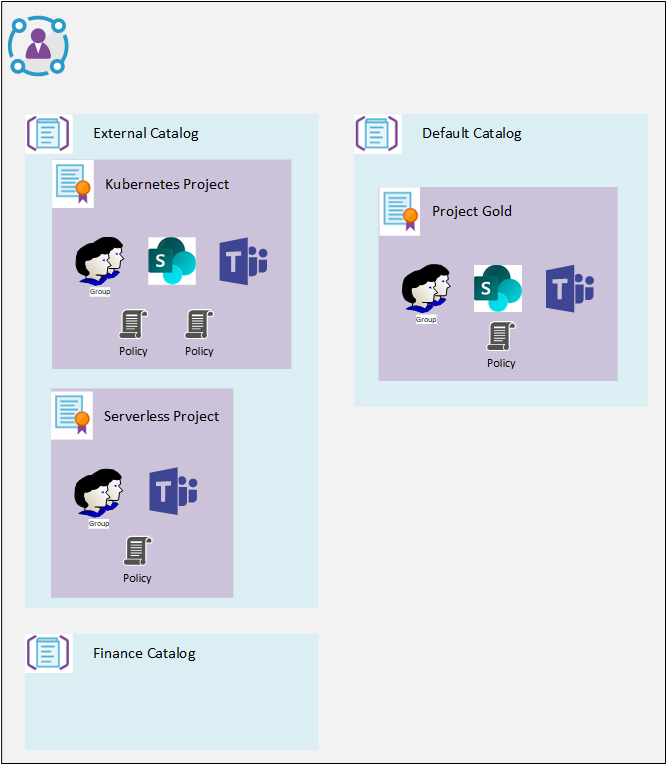
The top-level construct is a Catalog. Catalogs have their own RBAC, which allows users to define access packages, as well as other governance items. For more information see https://docs.microsoft.com/en-us/azure/active-directory/governance/entitlement-management-delegate.
Within a catalog you can create one or more Access Packages. An Access package defines which AD Groups, SharePoint sites, and Azure registered applications the user can access / is a member of.
An Access Package defines one or more Policies, which control who can request access, and who can approve access requests, when the access expires.
To grant access, an administrator can explicitly add a user to the access package, or the user can click a URL provided and request access. For an administrator to explicitly add a user they must already be a user in the Active Directory.
Let’s look at an example to illustrate the power of Entitlement Management.
Your company has a new Azure based project they are working on - an exploration of using Kubernetes. They have enlisted a trusted partner to help them, but also may have some consultants that need access which are not from the trusted partner.
As part of the project, the users need access to a Teams site for collaboration, an Azure Resource group where the work will be done creating various Azure resources such as container registries and Kubernetes clusters, and finally an Azure DevOps project where any code assets and task tracking will be stored. The project is expected to last until the end of the year (6 Months).
This is a typical scenario, and the steps a company would follow would likely be to:
In some cases, IT may create an Azure AD group for controlling access to the Azure Resource Group and DevOps. In either case, we have 2-3 roles involved in granting access and reviewing access. The process likely involves multiple tickets and will take multiple days.
When it comes to governance, we need to track somewhere that the users were added, why they were added, and what resources they were given access to. A manual process of reviews will be needed.
Another issue is what happens as the project expands and access to another resource is required – for example a SharePoint site. You will need to determine all the users who are part of the project and add them to the new site. Or perhaps the project runs longer than expected and you need to extend everyone’s credentials.
To support the project lets recap the need:
In preparation to support this, we will need to:
In Identity Governance we will create:
When a user is granted access to an Access Package, they will be automatically added to the Team group and the Azure AD group, providing them access to the specified resources. This is a very powerful feature – when projects extend or scope increase and access to new resources is required, simply adding them to the Access Package will grant access to all the existing users.
So, to support the scenario described above, first login to the Azure portal with a global administrator account that has an Azure AD P2 license.
In Part 2 we will see how this scenario can be implemented using Entitlement Management.
So, to support the scenario described above, first login to the Azure portal with a global administrator account that has an Azure AD P2 license. Follow the steps in the preparation section above to create the Team (“Kubernetes”), and 2 Azure AD Groups (“External Kubernetes Project”, “Kubernetes Project Owners”).
Add yourself to the project owners group.
Identity Governance Setup
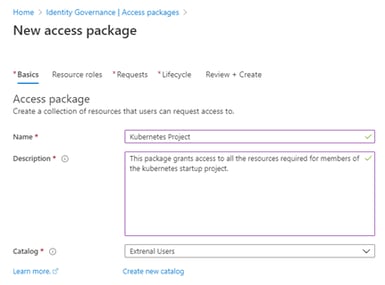
Select Catalogs and click New Catalog

Once created, select the new catalog, and select Access Packages, Click New Access Package
Define the Resource Roles
Select the “Group and Teams” button - find the Team created earlier – Kubernetes. Add the Azure AD group you created earlier - External Kubernetes Project.
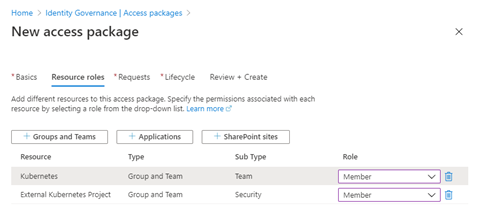
Set the role for the groups as Member.When someone is granted access to this package, they will be added to these groups at the level selected. When the access to the package is revoked, they will be removed from these groups.
Note: in the case where users need access to additional resources after they have been granted access to the access package they can be added to the package, and the users with existing package access will be granted access to the new resource. Conversely, if a resource is removed from the package, user access is removed.
The next step is to define how requests are handled and who can make requests.
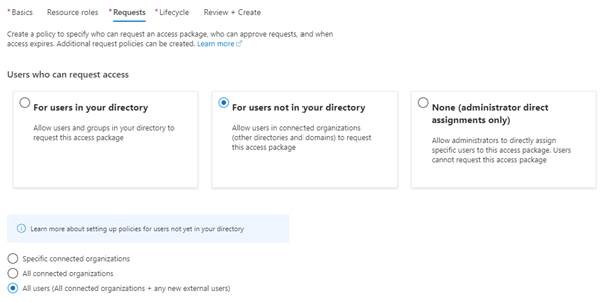
Select All users- this will allow users in connected organizations and users you provide the URL to request access. For more information on connected organizations see https://docs.microsoft.com/en-us/azure/active-directory/governance/entitlement-management-organization
Next, we will define the approval
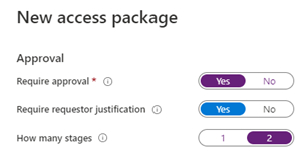
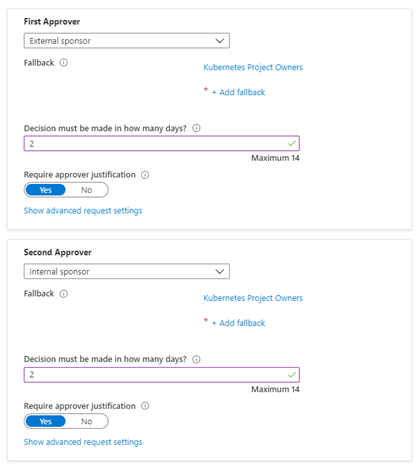
We are going to define a 2-stage review - in the case of users from a connected organization, the external sponsor can perform the first level of approval. This is a great feature where a vendor can add people to a project and then forward the request for final approval.
Next, we define the expiration and review processes
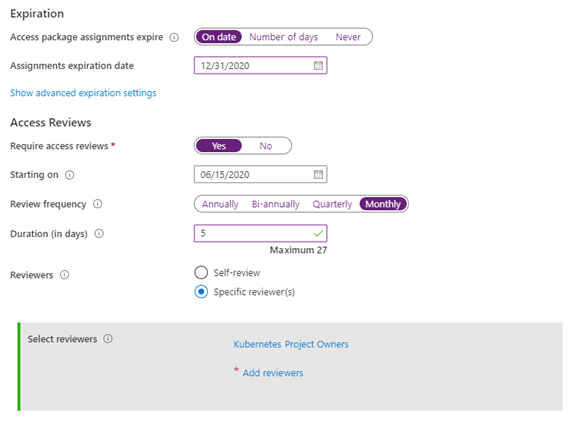
In this scenario the project is set to run to the end of the year - Access reviews will be created monthly and are allowed to take 5 days. The review is to be completed by members of the Kubernetes Project Owners. This allows us to change the people responsible for the project over time, but not need to change the governance.
At this point we have created the entitlement management objects needed.
Now that we the access package defined, we can go to the list of access packages and get the URI for access requests:
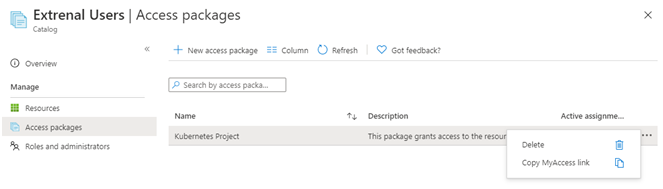
This link can then be shared with users who need access.
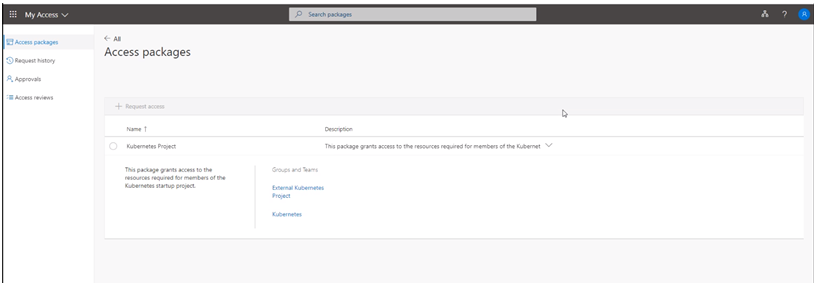
To test the link, log in with another Microsoft account, either a personal one or a Business / School account.
Following this link, you are presented with a list of Access Packages you can request access to.
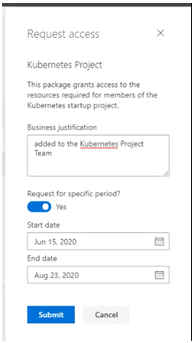
Select the radio button and click the request access.
You will be prompted to provide a business justification and an optional duration for the request.
You can then review your list or activeand pending access requests:
At any time, you can go to https://myaccess.microsoft.com to review your list of access packages.
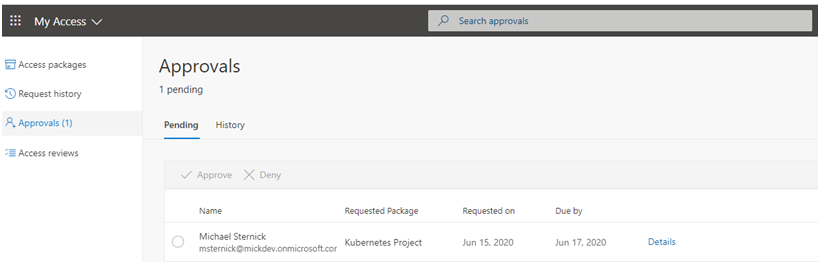
At this point, an approval request is sent via email, the approver can then follow the link in the email and review the approval requests:
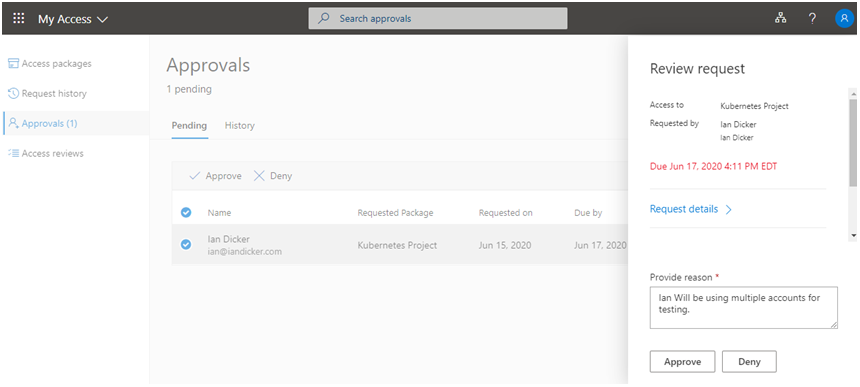
The approver can then review the request and either Approve or Deny the request.
We hope that this overview of Access Life Cycle Management using Entitlement Management opened your eyes to some important ways that you can maintain a good security perimeter. If you have any questions or comments, we would be glad to discuss further!

1 min read
In the rapidly evolving landscape of artificial intelligence, generative AI solutions are becoming increasingly central to a myriad of applications,...
.png)
1 min read
Why Copilot is not enough for knowledge management. A recent post from my friend Marc Anderson was a thought-provoking article on knowledge...
.png)
1 min read
For most people, the use of pattern-matching starts and ends with the Find tool, better known as Control-F on Windows and Linux and Command-F on Mac....