 Mick Sternick
1 min read
Unleashing the Power of Azure AI Foundry Agents: A Deep Dive into Knowledge and Action Tools
Imagine an AI agent capable of seamlessly combining knowledge retrieval, action-oriented functionality, and advanced analytics to deliver...

Creating a filter on a collection is rather simple, but how do you create a multi-level filter where a user can pick from 1-5 filter criteria and have any combination of them return the expected results? Let’s look at an example.
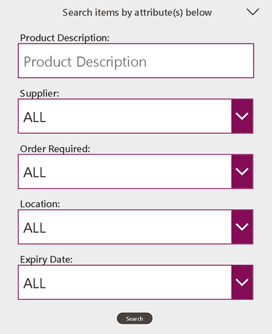
In this example, a user can enter any or all combinations and return a filtered sub-set from a single data set. So, if this was just a single filter, you could simply do something like this:
![]()
In this case, you would create a new collection by taking the original data set (‘Inventory Tracking’) and filter this by Supplier only if it was not equal to ‘ALL.’ This way, you can either return all results from the filter or a specific supplier.
Things are a little different if you need to create a multi-level filter. In this case, we need to create cascading collections that each filter off the prior while still being able return ‘ALL’ results for a particular filter if the user wants all suppliers, orders required, location, etc. See the below example:
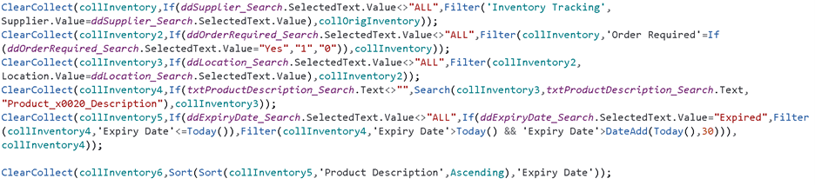
Here, each collection that is created is based off the results of its predecessor. In each collection creation, the notion of allowing ‘ALL’ results is returned or filtering based off user input. Each new collection then filters the results of the previous. In the final collection created (‘collInventory6’) the product description is sorted by ‘Expiry Date.’ You simply set your Gallery Items to (‘collInventory6’) and perform the above action on the Search button click.
Some suggestions for improvement to think about based off your user requirements:
We hope this overview and outline of how to use multiple filters on a single data set in Power Apps was helpful! If you have further questions or want to discuss this topic in more depth, please contact us today!

1 min read
Imagine an AI agent capable of seamlessly combining knowledge retrieval, action-oriented functionality, and advanced analytics to deliver...

1 min read
When people first hear about Copilot Agent Studio, they may assume it requires the same skills as data engineering or traditional software...

1 min read
Text classification is already embedded in most enterprises, even if teams don’t call it that. Support ticket routing, document tagging, incident...